Converting a Figma Design into a Hubspot CMS Page or Website

Welcome to the latest post in my popular series on doing "Pixel Perfect" conversions from Figma to a variety of different platforms. This one is going to be a little bit different, and much shorter, and there is a reason why.
In this series, I assume that you already know how to perform a conversion from a Figma file to raw static HTML and CSS files.
I only show you how the process differs when done in a different environment like say WebFlow or Oxygen Builder.
Making a static HTML file Hubspot-compatible is relatively simple
So you've been given the task of converting a Figma design into a Hubspot CMS template.
The good news is that the process is the same as converting a Figma file into a raw HTML page.
There are only a few additional steps after your HTML and CSS files are done. That is what we will be covering today.
But what about dynamic pages and content?
The main overall advantage of using a CMS is that it allows you to have dynamic pages and content, and that includes blog posts, content that changes based on the status of the visitor, and so much more.
However, I believe it can be useful to learn the basics of developing for a CMS environment by first creating static pages for said environment or platform. I think that WebFlow is a good example of a platform where this approach is common.
Most WebFlow clients ask for static sites that do not leverage WebFlow CMS functionality. This is why most WebFlow developers spend time learning how to create designs inside of WebFlow. They only get around to studying the CMS features when they get more advanced clients.
We will follow that same approach here as we simply move a static design into Hubspot CMS. This closely matches a business dynamic that many of your clients will follow as well.
Many clients just want to have a beatiful, informational company website hosted through their Hubspot account. This is a good starting point, as you can gradually introduce more advanced dynamic functionality into their website and landing pages.
You can learn more about this approach in my super useful article: The Truth About Creating Static Pages in a CMS.
The first step is to produce your static HTML files
As mentioned previously, in this series I assume you already know how to convert Figma files into raw HTML and CSS. So I will not be documenting this part. We'll skip straight to the Hubspot part.
For demonstration purposes, in this guide, I will use one of the Figma-to-HTML conversions I have completed previously for the Frontend Mentor challenge series.

You can find the completed files for this conversion in this GitHub Repo, and you can look at the hosted version of these files on Github Pages.
In addition, if you want to see a step-by-step overview of how I did the conversion to HTML, you can just click on the commit history, it is pretty thorough.
What I am going to do next, just for the sake of this Guide is to move these files to a folder called "Hubspot Demo Template". This is what it looks like inside the terminal.

Notice that at the end of the Figma-to-HTML conversion process, I have:
An index.html file that contains the page markup
A singular CSS file for all of the styling
An assets folder for the images used on this page
Before we continue, let's install the Hubspot CLI |
The next steps will require using Hubspot CLI commands. For that, we need to have the Hubspot CLI installed globally. To do so, you can just run: |
Next, let's convert our html file into a HubSpot-compatible page template file
The quickest and most convenient way I've found is to simply create an instance of a Hubspot example page template and modify it.
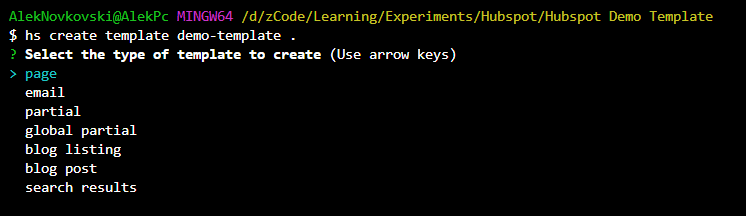
First, we will run the following command:hs create template demo-template .
In this case "demo-template" is the file name you want to give to the template, and the second bit is the location of the template file. Just make sure to choose "page" from the prompt that follows:
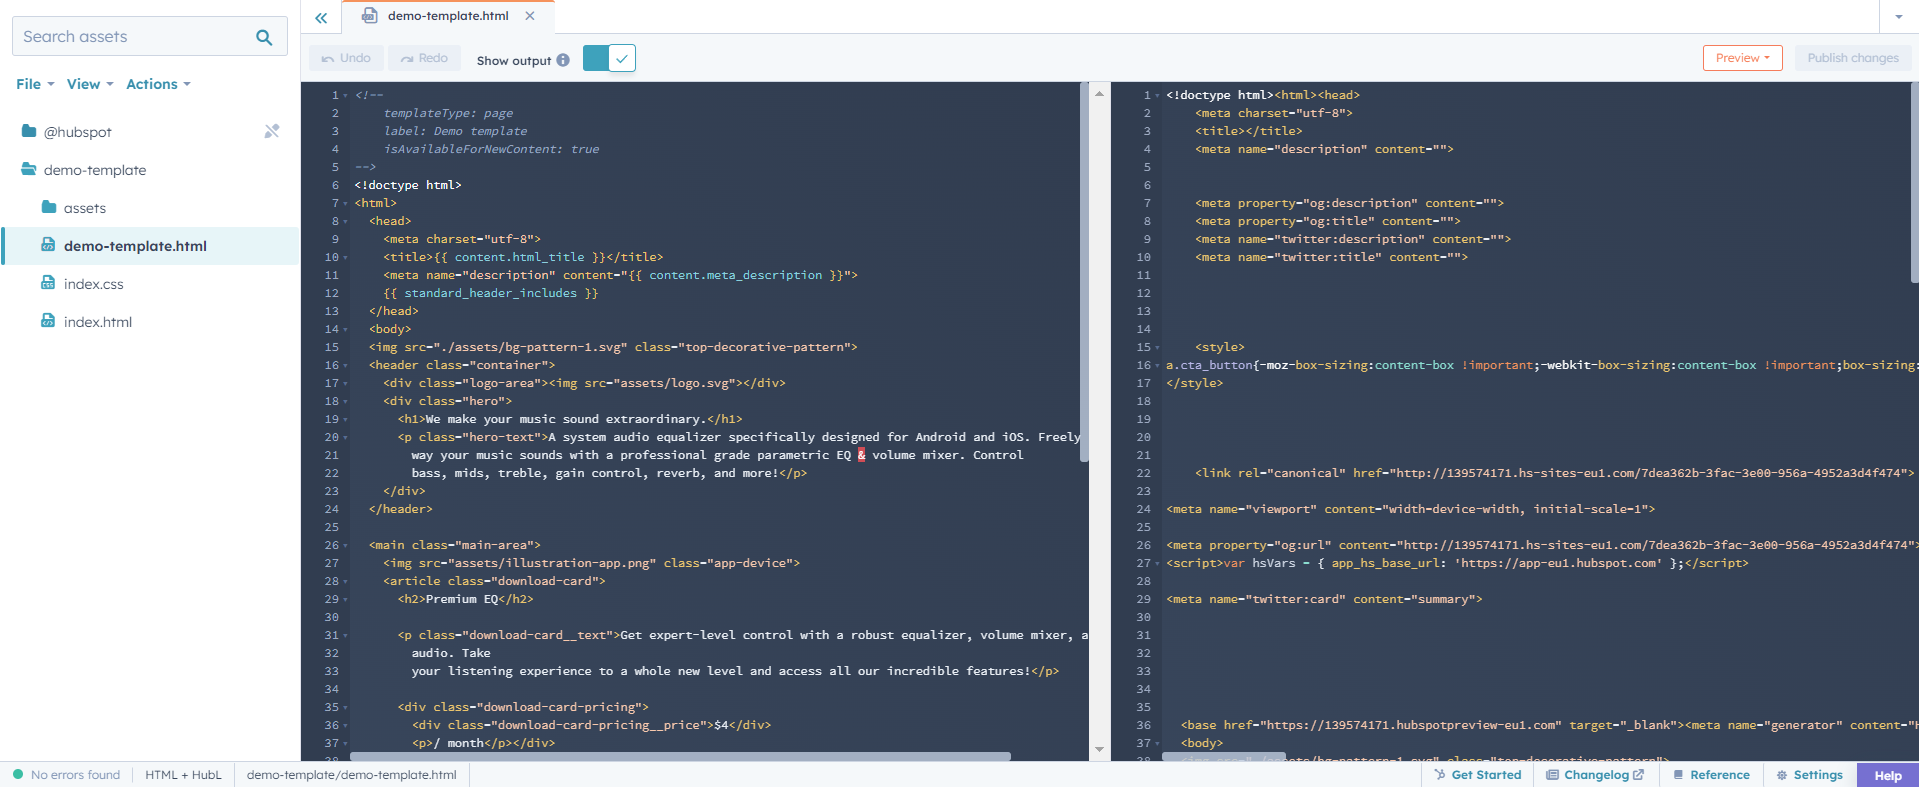
With that, we now have a file called "demo-template.html", and if we open it in our IDE, we can see the following:
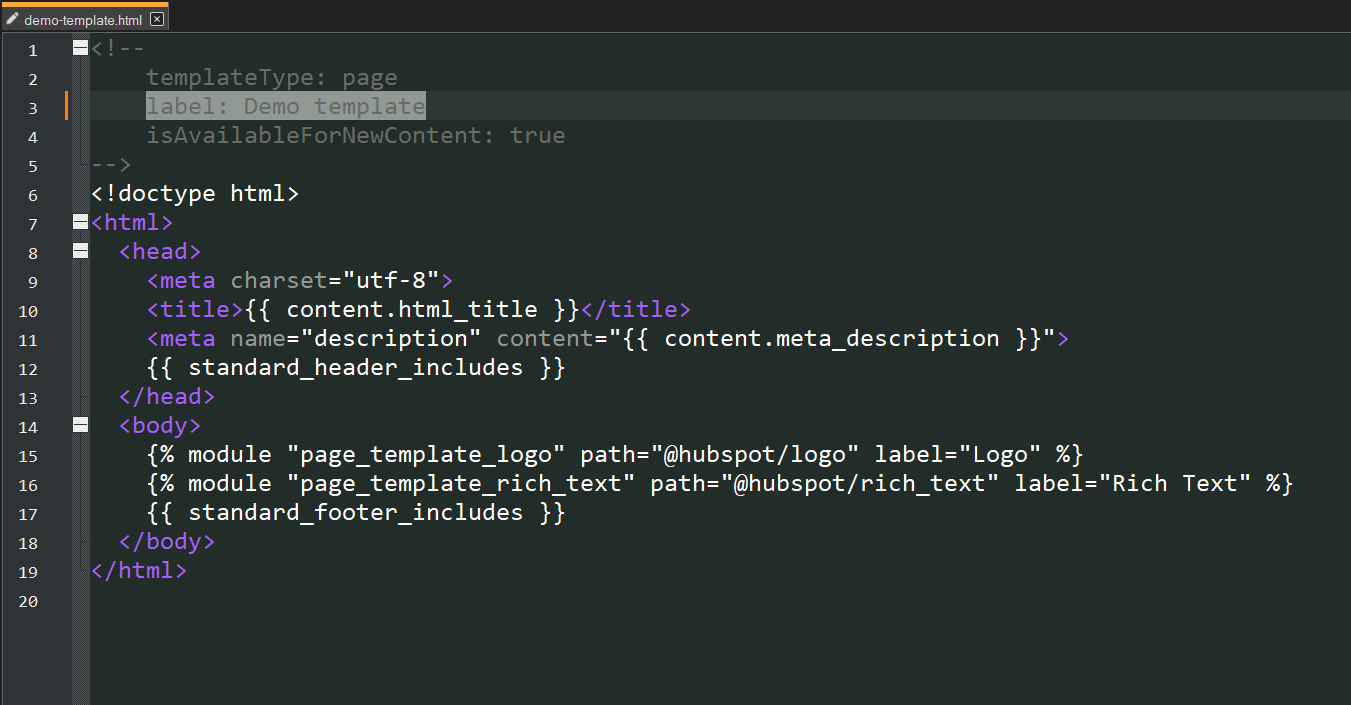
Notice that on top we have a comment which contains some meta information about what kind of template this is.
Also, notice that I changed the label to "Demo template". This is so that we can more easily recognize our template when we open the template library on Hubspot later on. You can name it whatever you want.
Beneath that template-defining comment is where the actual HTML document should be defined
You will notice however that there are some obvious differences from a regular HTML document. What's will all that stuff in double curly braces? That is HubL, it is Hubspot's templating language.
Some of the HubL tags you see in this document are mandatory, such as the header and footer includes. Others, like the two tags inside the body, are just examples. They show you how to use "Hubspot CMS modules" in a template.
In this guide, we're only creating a static template, so we won't be using any modules. This makes it easier to learn the core differences between a basic HTML document and a Hubspot template.
Let's get our static HTML design in here
Let's open up the index.html file. Remember, this is the file that contains all the markup from the end of our Figma-to-HTML conversion process.
We can simply start copying and adjusting relevant code into our Hubspot template file. Remember that we don't need the two module examples so feel free to delete them.
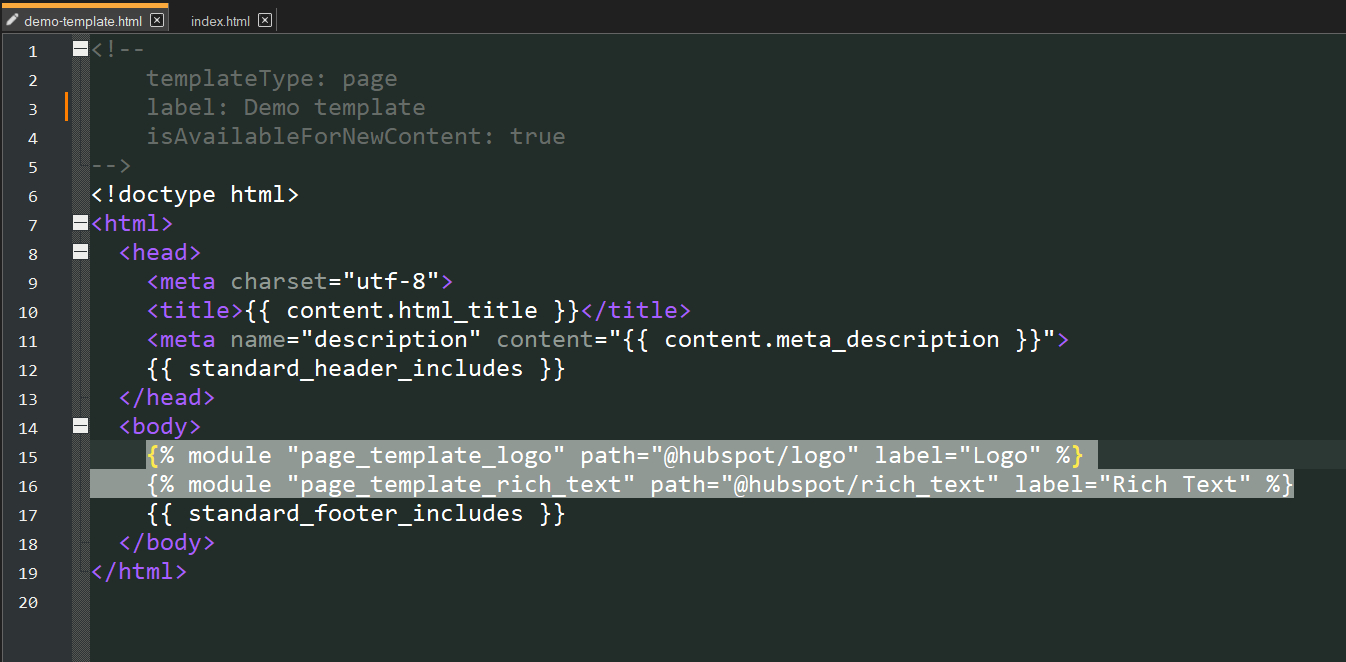
With the index.html file open you can just copy everything in between the opening and closing body tags.
Also, make sure to copy the stylesheet imports on top:
Let's check on our progress by uploading it to Hubspot
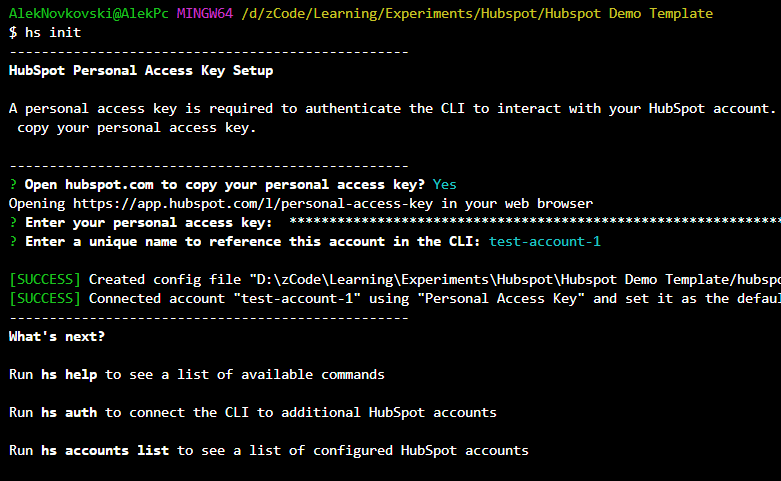
Before you can sync files from this directory to a Hubspot account, you need to initialize things with the hs init command. Just follow the prompts to enter your access key and link things together.
Once this is done, we can go ahead and upload our template to our Hubspot account using the following command:
hs upload . demo-template
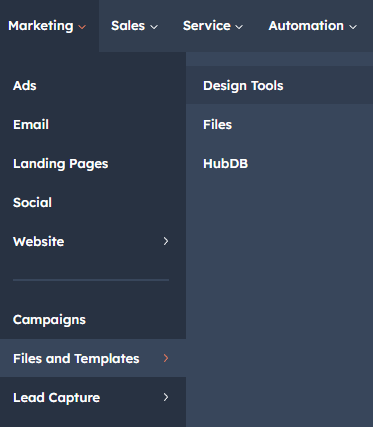
This will upload the current folder to a HubSpot folder called "demo-template". Now, let's go into Hubspot, and then go under Marketing > Files and Templates > Design Tools.
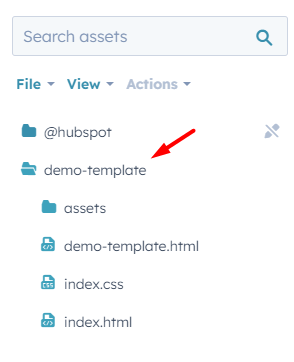
At this point, you should recognize the files in the file manager on the left side:
Let's click on demo-template.html and see what we get:
You will notice this works just like an IDE or text editor, except that on the right it shows you the final processed markup.
Let's go ahead and preview our template by clicking the preview button on top. And with that, we get to see the following on our screen:
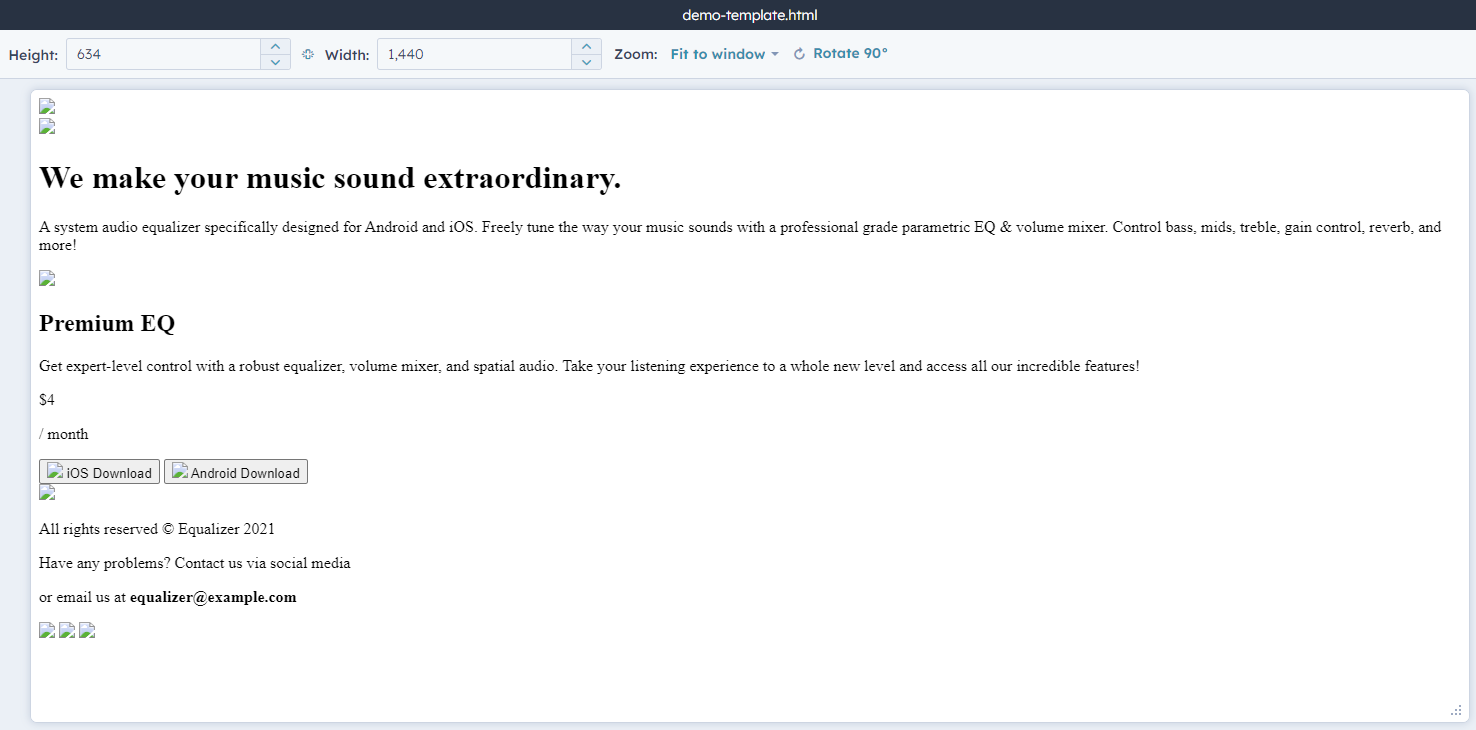
What happened? What's wrong here? Well, this is where our one final last tweak comes into play.
Assets have to be loaded with a specific HubL function called get_asset_url(). And so we have to replace all asset URLs in this HTML file.
If you're replacing image assets, they would go from this:
<img src="./images/my-image.png') }}">
To this:
<img src="{{ get_asset_url('./images/my-image.png') }}">
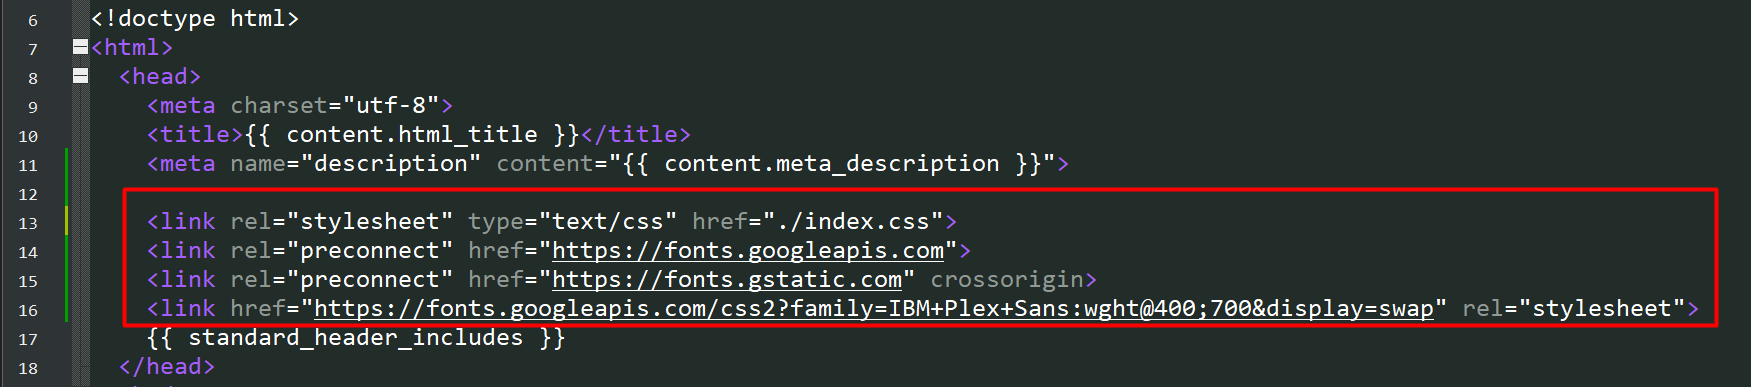
We need to do the same for the one local stylesheet on top of the file as well. So the stylesheet import will go from this:
<link rel="stylesheet" type="text/css" href="./index.css">
To This:
<link
rel="stylesheet"
type="text/css"
href="{{ get_asset_url('./index.css') }}"
>
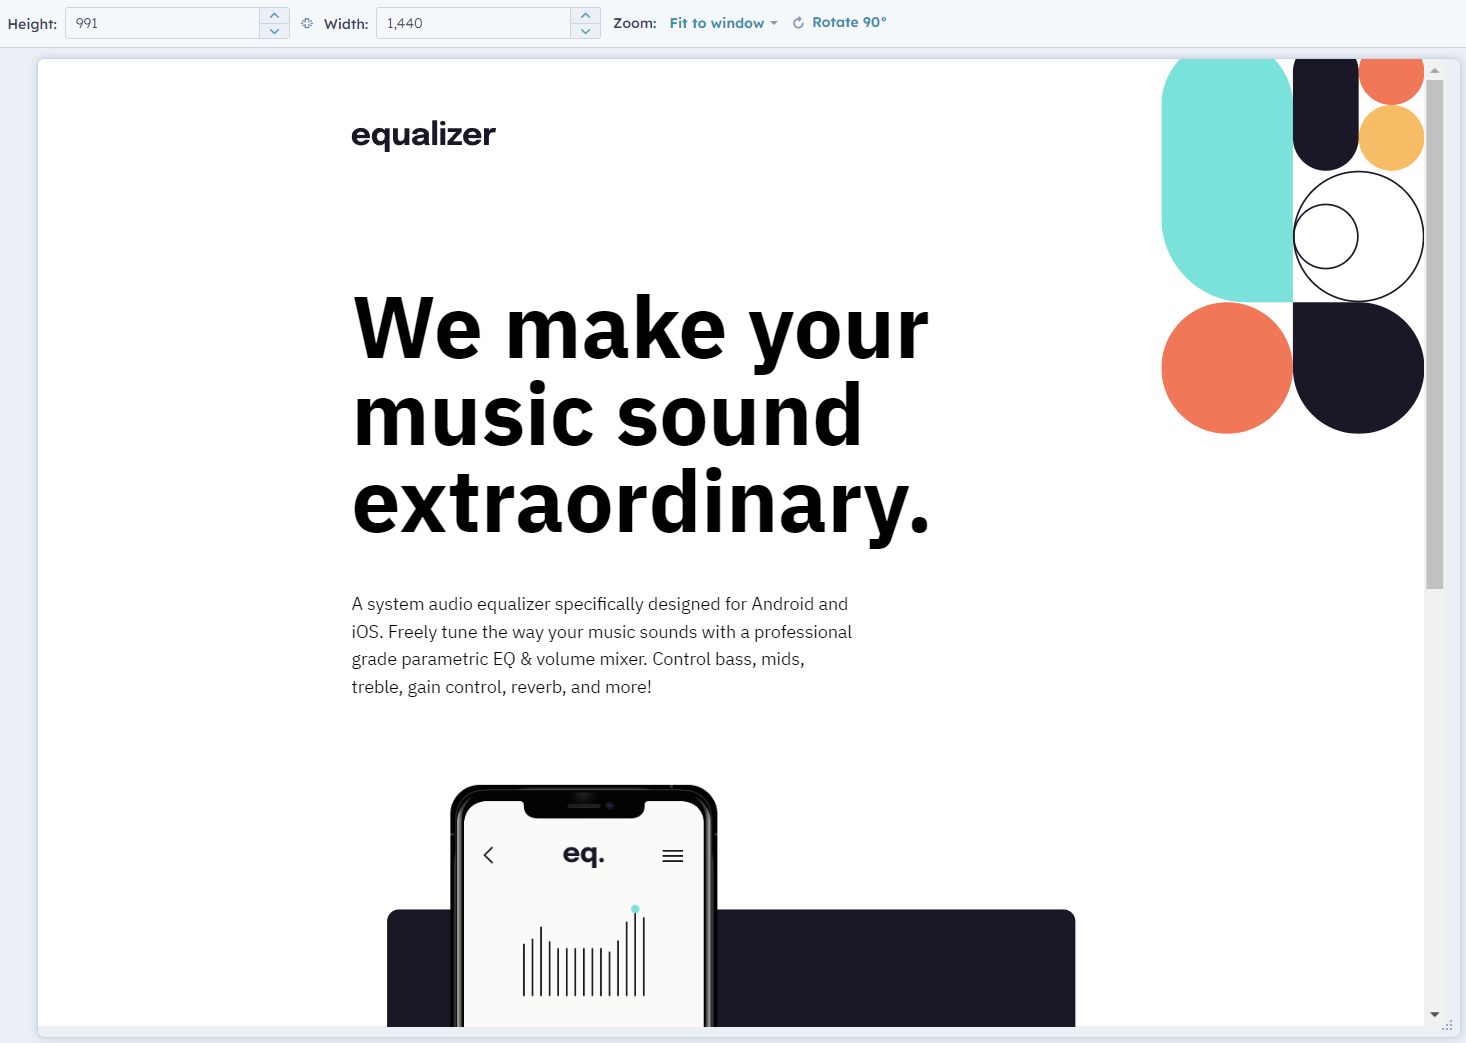
And with that, we are done
If you click on the preview button again, you will see that our beautiful landing page design has been fully imported into Hubspot. It is now available to your clients inside of their Hubspot accounts. They can decide when and where to host this landing page, and whether they want to send it a bunch of marketing and advertising traffic.
Let's Connect
If you found any of this guide helpful, feel free to subscribe to this Hashnode blog, or connect with me on LinkedIn. I am growing my LinkedIn profile at the moment, and love connecting with everyone.


